

Flutter BMI Calculator App
Recently I got message on Social Media that please help me I am unable to fix this bug.I asked for code and I saw that her code was insane.
I asked from where you are studying and I got response Udemy. I asked the instructor name and thought I should also start making course 😂.
Get Started #
Here is the video tutorial of building the BMI calculator, If you prefer watching video then you should watch this.
Step 1 #
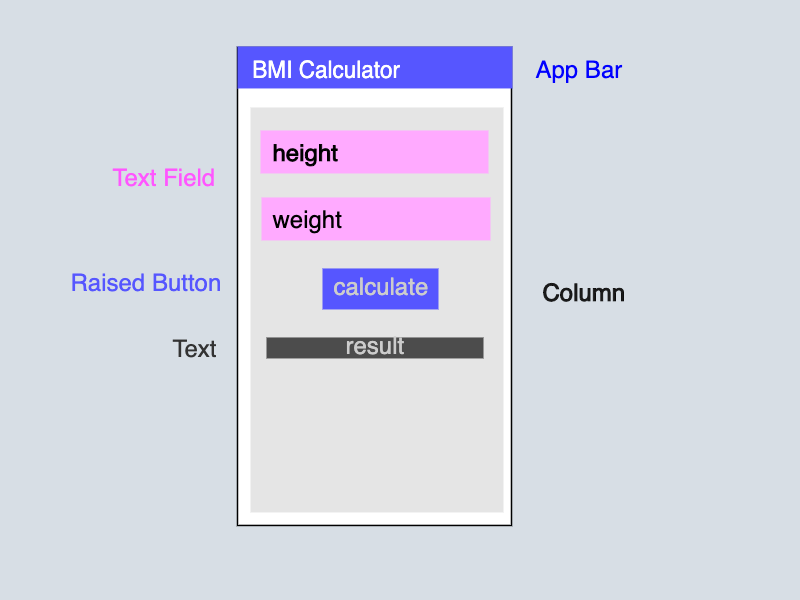
Let’s start the app by building the UI and it’s easy but I will break into small part so that it will be more clear.
These are the widget which I will be using in the application.
- AppBar
- Text
- Column
- Text Input
- Icon
- Text Button
Let’s build the basic scaffold firs then we will move into depth.
Skelton of the app #
Step 2 #
Let’s convert the skeleton to the flutter app.
 demo.dart
 return Scaffold(
appBar: AppBar(
title: Text('BMI Calculator'),
centerTitle: true,
backgroundColor: Colors.pinkAccent,
),
body: Column(
children: <Widget>[
TextField(
decoration: InputDecoration(
labelText: 'Weight in cm',
icon: Icon(Icons.trending_up),
),
),
SizedBox(height: 20),
TextField(
decoration: InputDecoration(
labelText: 'Weight in kg',
icon: Icon(Icons.line_weight),
),
),
SizedBox(height: 15),
TextButton(
color: Colors.pinkAccent,
child: Text(
"Calculate",
style: TextStyle(color: Colors.white),
),
onPressed: () {},
),
SizedBox(height: 15),
Text(
"Result will be here" ,
style: TextStyle(
color: Colors.redAccent,
fontSize: 19.4,
fontWeight: FontWeight.w500,
),
),
],
)
The above Code UI WILL BE ADDED HERE
Step 3 #
Now we will bind the input controller with the weight and height field. It will help us in getting the value from the field.
partial-demo.dart
  final TextEditingController _heightController = TextEditingController();
  final TextEditingController _weightController = TextEditingController();
Now we have defined two controller for two Text Field. Let attach to the the respective text field, So that we could have control over the Text Field.
partial-demo.dartTextField(
controller: _heightController, // Added
decoration: InputDecoration(
labelText: 'height in cm',
icon: Icon(Icons.trending_up),
),
),
Let’s attach tot he wight also.
partial-demo.dartTextField(
controller: _weightController, // Added
decoration: InputDecoration(
labelText: 'weight in kg',
icon: Icon(Icons.line_weight),
),
),
Step 4 #
Now we will write the function to Calculator BMI and add the event with button click event. So whenever we will click on the button it will calculate the BMI.
Let me show you the formula first then we will add this to our file demo.dart based on our case.
/*
    @params heigh is in Meter
    @params weight is in Kilogram
*/
double calculateBMI(double height, double weight){
    double heightSquare = height * height;
    double result = weight / heightSquare;
    return result;
}
void calculateBMI(){
    double height = double.parse(_heightController.text) / 100;
    double weight = double.parse(_weightController.text);
    // We dived height by 100 because we are taking the height in centimeter
    // and formula takes height in meter.

    double heightSquare = height * height;
    double result = weight / heightSquare;
    print(result);
}
Let’s attach the method to the button click or press.
partial-demo.dartTextButton(
color: Colors.pinkAccent,
child: Text(
"Calculate",
style: TextStyle(color: Colors.white),
),
onPressed: calculateBMI,
),
STEP 5 #
In the previous step we created the BMI calculator which kind of works but there is problem. The app is showing the result in the console and we want in the app.
partial-demo.dartdouble _result; // new variable defined for result
void calculateBMI(){
double height = double.parse(_heightController.text) / 100;
double weight = double.parse(_weightController.text);
// We dived height by 100 because we are taking the height in centimeter
// and formula takes height in meter.
double heightSquare = height * height;
double result = weight / heightSquare;
print(result);
// setState will update the UI
setState((){
result = result;
});
}
We are still missing one things, we have never called the result variable in the UI. We just defined the result variable so If would have called this earlier then this would be injustice for the reader.
partial-demo.dartText(
_result == null ? "Enter Value" : "BMI : $_result",
style: TextStyle(
color: Colors.redAccent,
fontSize: 19.4,
fontWeight: FontWeight.w500,
),
),
Step 6 #
In this step we will limit the two digit after the decimal so that it will look consistent and not break the UI.
The above code is good and everything works fine but there is a UI related issue which user will face someday.
There is one more issue that the decimal value could be very long i.e. There could be 2 digit after decimal or 8 digit after decimal.
Let’s make the UI consistent by doing a simple tweaks.
partial-demo.dartText(
_result == null ? "Enter Value" : "BMI : ${_result.toStringAsFixed(2)}",
style: TextStyle(
color: Colors.redAccent,
fontSize: 19.4,
fontWeight: FontWeight.w500,
),
),
toStringAsFixedallow us to limit the number of number after decimal.
Conclusion #
I break down the everything into small parts so that it will become easy to follow. Let me know if I succeed in doing that or not or you still face issue in understanding this.
If you are beginner and understand everything then it’s really good because you learn lots of important things.
- TextInput
- Text Input Controller
- Calling Method
- Updating UI
You can share the feedback in the comment or tweet about the also (don’t forget to tag @nstack_in).
Full Source Code #
The full source code be also found at the github but code is not very big so I put it here also.
I would have added
Sptadeepa Ghoshgithub url but she don’t use GitHub.
main.dartimport 'package:flutter/material.dart';
import 'demo.dart';
void main() {
runApp(MyApp());
}
class MyApp extends StatelessWidget {
@override
Widget build(BuildContext context) {
return MaterialApp(
theme: ThemeData(
primaryColor: Colors.pinkAccent,
),
home: Demo(),
);
}
}
import 'package:flutter/material.dart';
class Demo extends StatefulWidget {
@override
_DemoState createState() => _DemoState();
}
class _DemoState extends State<Demo> {
final TextEditingController _heightController = TextEditingController();
final TextEditingController _weightController = TextEditingController();
double _result;
@override
Widget build(BuildContext context) {
return Scaffold(
appBar: AppBar(
title: Text('BMI Calculator'),
centerTitle: true,
backgroundColor: Colors.pinkAccent,
),
body: Container(
padding: EdgeInsets.symmetric(horizontal: 10.0),
child: Column(
mainAxisAlignment: MainAxisAlignment.center,
children: <Widget>[
TextField(
controller: _heightController,
keyboardType: TextInputType.number,
decoration: InputDecoration(
labelText: 'height in cm',
icon: Icon(Icons.trending_up),
),
),
SizedBox(height: 20),
TextField(
controller: _weightController,
keyboardType: TextInputType.number,
decoration: InputDecoration(
labelText: 'weight in kg',
icon: Icon(Icons.line_weight),
),
),
SizedBox(height: 15),
TextButton(
    color: Colors.pinkAccent,
    child: Text(
        "Calculate",
        style: TextStyle(color: Colors.white),
    ),
    onPressed: calculateBMI,
),
SizedBox(height: 15),
Text(
_result == null ? "Enter Value" : "${_result.toStringAsFixed(2)}",
style: TextStyle(
color: Colors.redAccent,
fontSize: 19.4,
fontWeight: FontWeight.w500,
),
),
],
),
),
);
}
void calculateBMI() {
double height = double.parse(_heightController.text) / 100;
double weight = double.parse(_weightController.text);
double heightSquare = height * height;
double result = weight / heightSquare;
_result = result;
setState(() {});
}
}
 Tweet this article