Introduction #
We will be creating a form and submitting the data to the database. Our AIM is to learn how we can fetch the data from the form and submit in the form. We will not be discussing the form data validation.
You should not keep the expectation that you will learn about the form validation.
We will break the complete article into 6 parts. In every part, we will do something new and if you face some problem you can comment on the step number with the error. We will be happy to help you.
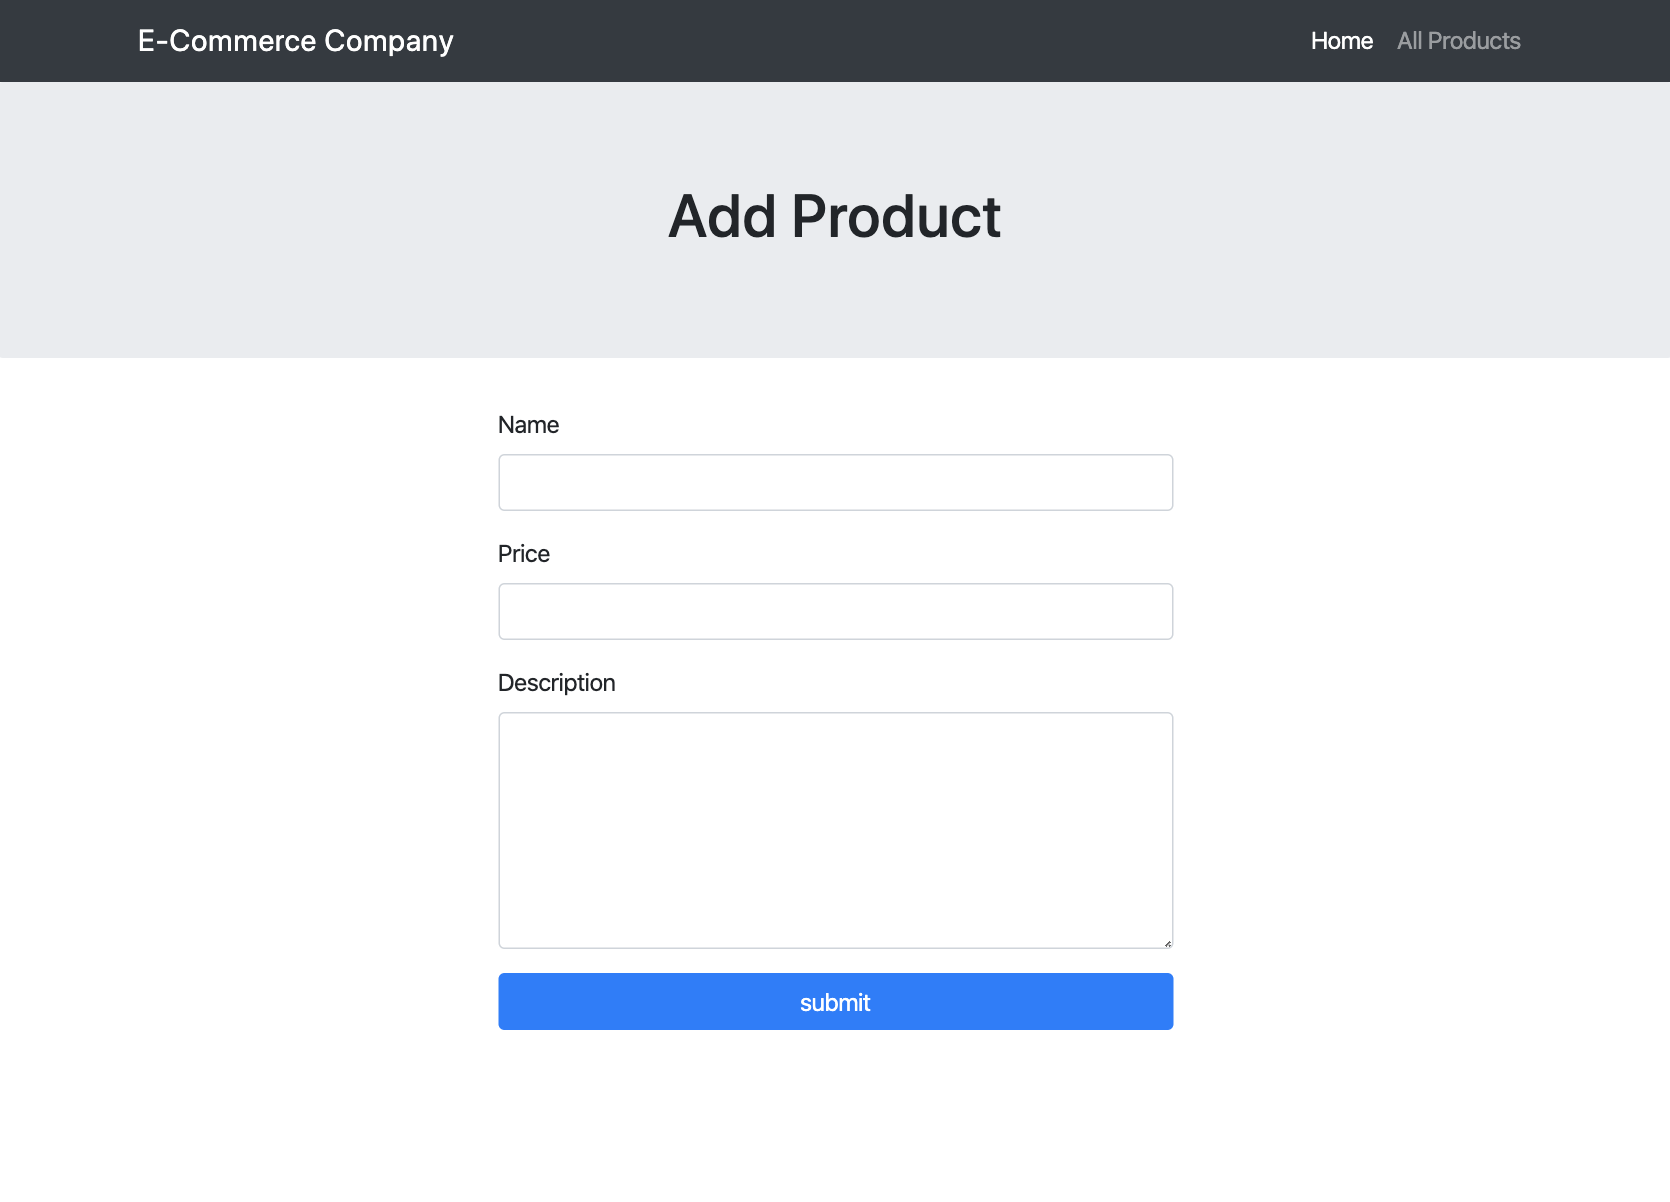
Suppose we are creating a form for E-commerce Website which want to add a product to the database. Here is UI for adding products to the database of e-commerce of the website.
You can see in the above image that it has three different fields.
Field is the above Image
- Product Name
- Product Price
- Product Description
The above UI is made using the Bootstrap. Bootstrap is an open-source toolkit for developing with HTML, CSS, and JS. It helps us to quickly prototype our ideas or build your entire app.
You need to worry about the above UI code as I am going to provide a complete source code.
 index.html
 1
2
3
4
5
6
7
8
9
10
11
12
13
14
15
16
17
18
19
20
21
22
23
24
25
26
27
28
29
30
31
32
33
34
35
36
37
38
39
40
41
42
43
44
45
46
47
48
49
50
51
52
53
54
55
| <!DOCTYPE html>
<html lang="en">
<head>
<meta charset="UTF-8">
<meta name="viewport" content="width=device-width, initial-scale=1.0">
<title>E-Commerce Company</title>
<link rel="stylesheet" href="https://stackpath.bootstrapcdn.com/bootstrap/4.4.1/css/bootstrap.min.css" integrity="sha384-Vkoo8x4CGsO3+Hhxv8T/Q5PaXtkKtu6ug5TOeNV6gBiFeWPGFN9MuhOf23Q9Ifjh" crossorigin="anonymous">
</head>
<body>
<nav class="navbar navbar-expand-lg navbar-dark bg-dark">
<div class="container">
<a class="navbar-brand" href="#">E-Commerce Company</a>
<button class="navbar-toggler" type="button" data-toggle="collapse" data-target="#navbarText" aria-controls="navbarText" aria-expanded="false" aria-label="Toggle navigation">
<span class="navbar-toggler-icon"></span>
</button>
<div class="collapse navbar-collapse" id="navbarText">
<ul class="navbar-nav ml-auto">
<li class="nav-item active">
<a class="nav-link" href="./">Home</a>
</li>
<li class="nav-item">
<a class="nav-link" href="./show.php">All Products</a>
</li>
</ul>
</div>
</div>
</nav>
<div class="jumbotron">
<h1 class="text-center">
Add Product
</h1>
</div>
<div class="container">
<div class="row">
<div class="col-md-6 offset-md-3 col-sm-12">
<form action="./submit.php" method="POST">
<div class="form-group">
<label for="name">Name</label>
<input type="text" class="form-control" name="pname" id="name" value="<?= $olddata['name'] ?>">
</div>
<div class="form-group">
<label for="price">Price</label>
<input type="text" class="form-control" name="pprice" id="price" value="<?= $olddata['price'] ?>">
</div>
<div class="form-group">
<label for="description">Description</label>
<textarea class="form-control" name="pdescription" id="description" cols="30" rows="6"><?= $olddata['description'] ?></textarea>
</div>
<input type="submit" name="submitForm" value="submit" class="btn btn-primary btn-block">
</form>
</div>
</div>
</div>
</body>
</html>
|
Highlighted Line
- #7 : This line is adding bootstrap css to the our webpage.
- #36 : This line says that our form will be submitted to
submit.php and method is POST. - #39, #43, #47 : You can see the name attribute in these three lines. Name attribute help us in getting the data at the backend.
- In the last step at Line #7, I mention to submit form at
form.php. - In this step, we will create
form.php and get the data which will be submitted by that form.
submit.php 1
2
3
4
5
6
7
8
9
10
11
12
| <?php
if(isset($_POST['submitForm'])){
$name = $_POST['pname'];
$price = $_POST['pprice'];
$description = $_POST['pdescription'];
echo "Name : $name <br> Price : $price <br> Description : $description";
}else{
// Someone open this page by entering the `submit.php` page url
echo "no submit";
}
?>
|
- #2, I am using String
isset. isset is used to check if variable is declared and is different than NULL. In our case it is checking for NULL. - #6, I am using String
String Interpolation. String Interpolation is used to insert variable in the string.
Step 3: Creating database in MySQL #
Let’ Create the database and table in MySQL. So, that we can insert data into the Tables.
There is phpmyadmin which help us in doing all the database thing using GUI.
- Open phpmyadmin, it is usually available at
localhost/phpmyadmin - In the left top you will find
new button. click on that to create new database. - Enter the database and click on Create ,
my database name is crud. - Now create a table with four columns.
- id : type:
int with auto-increment - name : type:
varchar length : 32 - price : type
int - description : type
varchare length : 512
That’s it, you are ready with you table. We will be doing all four operation on this table only.
Step 4: Connecting to MySQL #
Now we will make a connection between PHP and MySQL. I am going to make a connection in a new file db.php. I am doing this in new file because to Create, Read, Update and Delete we need the connection. If I separate the connection file we can reuse this as many times as we want.
db.php 1
2
3
4
5
6
7
8
9
10
11
12
13
14
15
16
| <?php
$server = "localhost";
$user = "root";
$pass = "";
$db = "crud"
$con = new mysqli($server, $user, $pass, $db);
if($con->connect_error){
die("Connection Error");
}
else{
echo "Connected Successfully";
}
?>
|
Make sure your MySQL service is running or else you will find error in this step.
Once you added this code to you db.php. It will try to establish the connection with MySQL. If everything goes well then it will show you a message on the browser that Connected Successfully.
Please remove the line #12 -#14 once you database get connected. I wrote that line just to make sure that you get good message when you make connection with the database.
Step 5: Inserting data to MySQL #
We made a connection between PHP and MySQL in then in db.php. It’s time to use the connection to use in inserting the data into the database.
submit.php 1
2
3
4
5
6
7
8
9
10
11
12
13
14
15
16
17
18
19
20
21
| <?php
require_once('db.php');
if(isset($_POST['submitForm'])){
$name = $_POST['pname'];
$price = $_POST['pprice'];
$description = $_POST['pdescription'];
$sql = "INSERT INTO `product`(`name`, `price`, `description`)
VALUES ('$name', $price, '$description')";
if($con->query($sql) === TRUE){
echo "Data Inserted Successfully";
}else{
echo "something went wrong";
}
}else{
// Someone open this page by entering the `submit.php` page url
echo "no submit";
}
?>
|
Line #2 : It executes the db.php first then it moves forward in submit.php. It means whatever we did in the db.php will be executed first then it will follow up the submit.php. If you remember we defined $con variable in the db.php which stores the connection object. we will use the con variable to insert data in the database.
Line #9 : It is just a SQL Query which is being build using php form data. Whatever we are sending from the form is being set as the value of MySQL fields.
Line #12 : It is just confirming if the query get executed successfully or not.
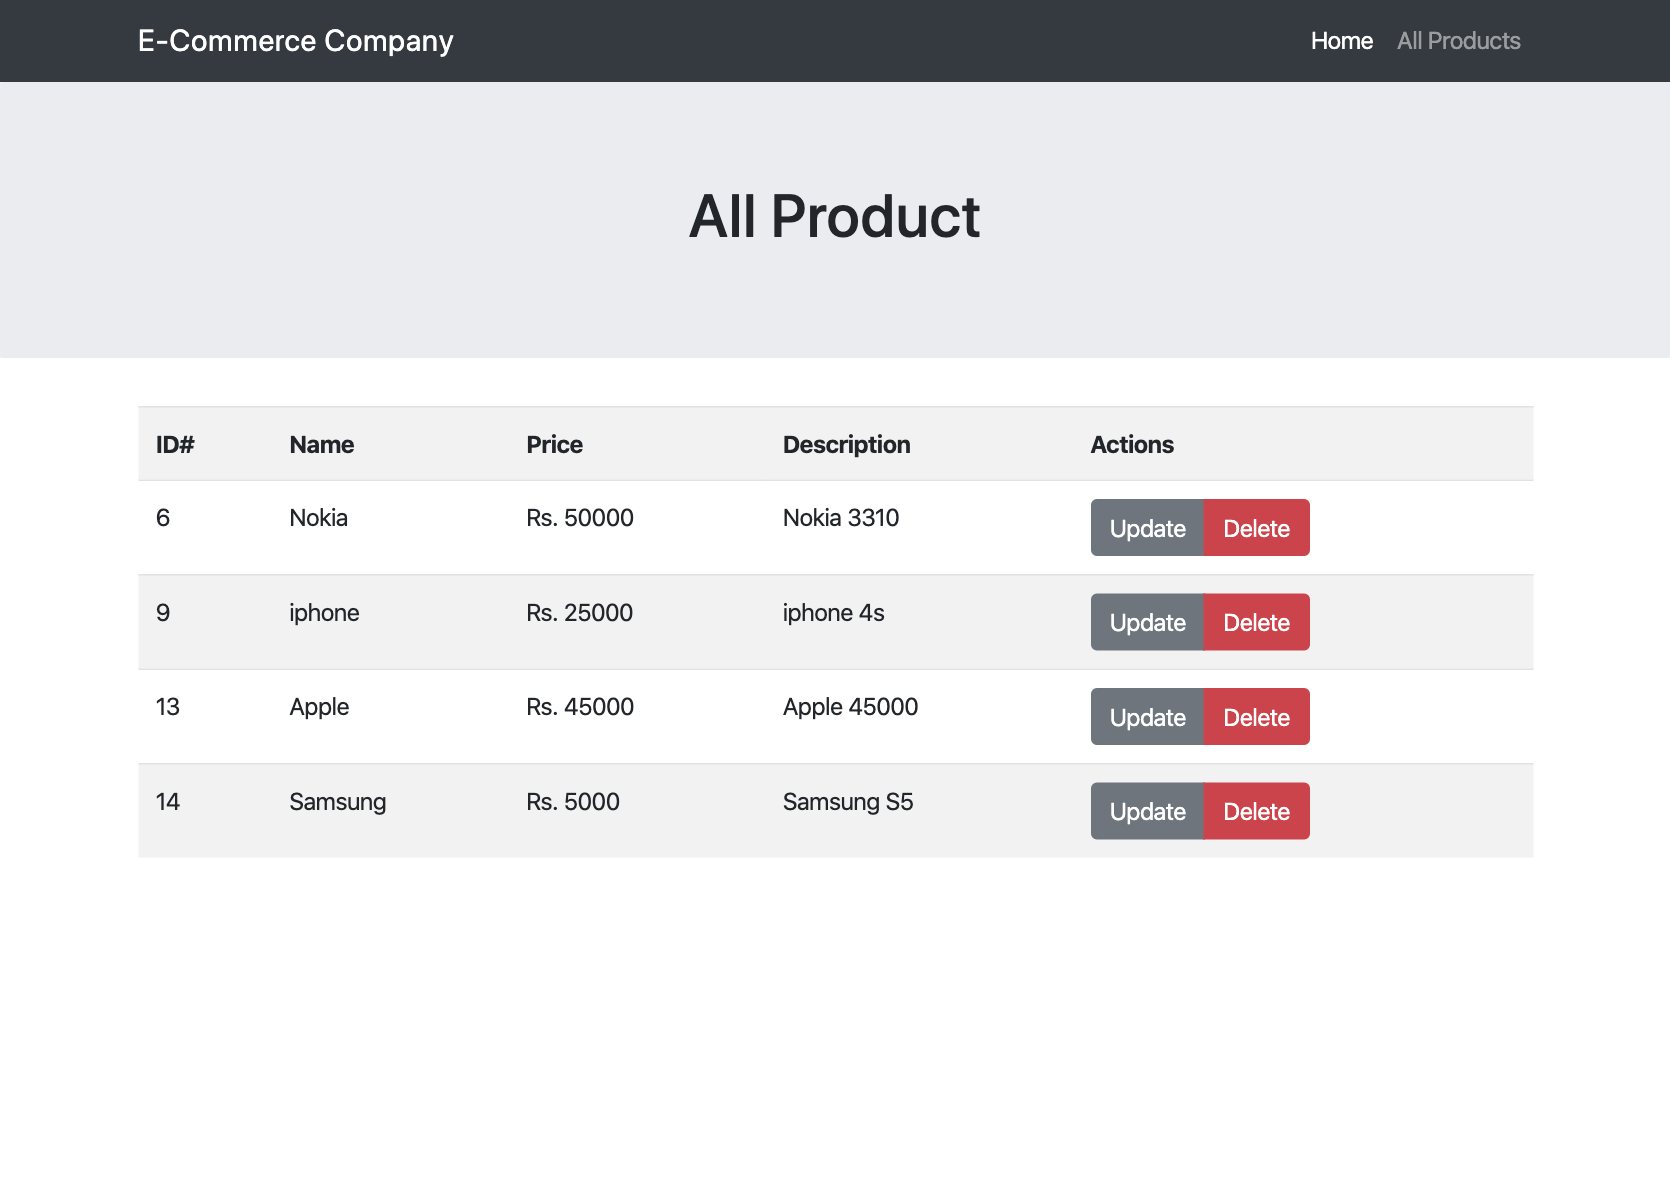
Step 6: Fetching Data from the MySQL #
In this step, we will be fetching the data from the database and showing at our website.
- Complete code of fetching the data is little long because it includes markup also.
- I highlighted the code which you must see and is very important to understand the fetching data.
show.php 1
2
3
4
5
6
7
8
9
10
11
12
13
14
15
16
17
18
19
20
21
22
23
24
25
26
27
28
29
30
31
32
33
34
35
36
37
38
39
40
41
42
43
44
45
46
47
48
49
50
51
52
53
54
55
56
57
58
59
60
61
62
63
64
65
66
67
68
69
70
| <?php
require_once('db.php');
$sql = "SELECT * FROM `product`";
$result = $con->query($sql);
?>
<!DOCTYPE html>
<html lang="en">
<head>
<meta charset="UTF-8">
<meta name="viewport" content="width=device-width, initial-scale=1.0">
<title>Product Company</title>
<link rel="stylesheet" href="https://stackpath.bootstrapcdn.com/bootstrap/4.4.1/css/bootstrap.min.css" integrity="sha384-Vkoo8x4CGsO3+Hhxv8T/Q5PaXtkKtu6ug5TOeNV6gBiFeWPGFN9MuhOf23Q9Ifjh" crossorigin="anonymous">
</head>
<body>
<nav class="navbar navbar-expand-lg navbar-dark bg-dark">
<div class="container">
<a class="navbar-brand" href="#">Product Company</a>
<button class="navbar-toggler" type="button" data-toggle="collapse" data-target="#navbarText" aria-controls="navbarText" aria-expanded="false" aria-label="Toggle navigation">
<span class="navbar-toggler-icon"></span>
</button>
<div class="collapse navbar-collapse" id="navbarText">
<ul class="navbar-nav ml-auto">
<li class="nav-item active">
<a class="nav-link" href="http://localhost/crud/">Home</a>
</li>
<li class="nav-item">
<a class="nav-link" href="http://localhost/crud/show.php">All Products</a>
</li>
</ul>
</div>
</div>
</nav>
<div class="jumbotron">
<h1 class="text-center">
Product Company
</h1>
</div>
<div class="container">
<table class="table table-striped table-borderrer">
<tr>
<th>ID#</th>
<th>Name</th>
<th>Price</th>
<th>Description</th>
<th>Actions</th>
</tr>
<?php
if($result->num_rows > 0 ){
while($row = $result->fetch_assoc()){
echo "<tr>";
echo "<td>" . $row['id'] . "</td>";
echo "<td>" . $row['name'] . "</td>";
echo "<td> Rs. " . $row['price'] . "</td>";
echo "<td>" . $row['description'] . "</td>";
echo "<td>";
echo "<div class='btn-group'>";
echo "<a class='btn btn-secondary' href='./update.php?id=" .$row['id'] ."'> Update </a>";
echo "<a class='btn btn-danger' href='./delete.php?id=" .$row['id'] ."'> Delete</a>";
echo "</div>";
echo "</td>";
echo "</tr>";
}
}
?>
</table>
</div>
</body>
</html>
|
Line #2 : I believe you understand,it’s responsible for making connection with MySQL(database).
Line #50-#68 : This is responsible for showing doing all magic. Showing data to us in html page.
- #50 : First we are checking if we got some data from the database because there is possibilities that there will be no data in the table. You can show
NO DATA AVAILABLE in else case, if you want. - #51 : Once we are confirm that we have data then we are running a loop through all our data.
Once you understand how fetching and loop is working then you got the magic. Now you are also magician.
Step 7: Updating Data from the MySQL #
This feature has lots of code but only some code is logical. Most of the code is related to markup and UI.
- For convince I highlighted all the code which is logical or which
you must see.
edit.php 1
2
3
4
5
6
7
8
9
10
11
12
13
14
15
16
17
18
19
20
21
22
23
24
25
26
27
28
29
30
31
32
33
34
35
36
37
38
39
40
41
42
43
44
45
46
47
48
49
50
51
52
53
54
55
56
57
58
59
60
61
62
63
64
65
66
67
68
69
70
71
72
73
| <?php
require_once('db.php');
if(!isset($_GET['id'])){
// redirect to show page
die('id not provided');
}
$id = $_GET['id'];
$sql = "SELECT * FROM `product` where id = $id";
$result = $con->query($sql);
if($result->num_rows != 1){
// redirect to show page
die('id is not in db');
}
$data = $result->fetch_assoc();
?>
<!DOCTYPE html>
<html lang="en">
<head>
<meta charset="UTF-8">
<meta name="viewport" content="width=device-width, initial-scale=1.0">
<title>Product Company</title>
<link rel="stylesheet" href="https://stackpath.bootstrapcdn.com/bootstrap/4.4.1/css/bootstrap.min.css" integrity="sha384-Vkoo8x4CGsO3+Hhxv8T/Q5PaXtkKtu6ug5TOeNV6gBiFeWPGFN9MuhOf23Q9Ifjh" crossorigin="anonymous">
</head>
<body>
<nav class="navbar navbar-expand-lg navbar-dark bg-dark">
<div class="container">
<a class="navbar-brand" href="#">Product Company</a>
<button class="navbar-toggler" type="button" data-toggle="collapse" data-target="#navbarText" aria-controls="navbarText" aria-expanded="false" aria-label="Toggle navigation">
<span class="navbar-toggler-icon"></span>
</button>
<div class="collapse navbar-collapse" id="navbarText">
<ul class="navbar-nav ml-auto">
<li class="nav-item active">
<a class="nav-link" href="http://localhost/crud/">Home</a>
</li>
<li class="nav-item">
<a class="nav-link" href="http://localhost/crud/show.php">All Products</a>
</li>
</ul>
</div>
</div>
</nav>
<div class="jumbotron">
<h1 class="text-center">
Product Company
</h1>
</div>
<div class="container">
<div class="row">
<div class="col-md-6 offset-md-3 col-sm-12">
<form action="./modify.php?id=<?= $id ?>" method="POST">
<h3>Edit Form</h3>
<div class="form-group">
<label for="name">Name</label>
<input type="text" class="form-control" name="pname" id="name" value="<?= $data['name']?>">
</div>
<div class="form-group">
<label for="price">Price</label>
<input type="text" class="form-control" name="pprice" id="price" value="<?= $data['price']?>">
</div>
<div class="form-group">
<label for="description">Description</label>
<textarea class="form-control" name="pdescription" id="description" cols="30" rows="10"><?= $data['description']?></textarea>
</div>
<input type="submit" name="editForm" value="submit" class="btn btn-primary btn-block">
</form>
</div>
</div>
</div>
</body>
</html>
|
Now it’s time to handle the data which you requested for the modification. If you know the SQL query that how to update the data this is not any magic for you.
modify.php 1
2
3
4
5
6
7
8
9
10
11
12
13
14
15
16
17
18
19
20
21
22
23
24
25
| <?php
require_once('db.php');
if(isset($_GET['id']) && isset($_POST['editForm'])){
$id = $_GET['id'];
$name = $_POST['pname'];
$price = $_POST['pprice'];
$description = $_POST['pdescription'];
$sql = "UPDATE `product` SET
`name`= '$name',
`price`= '$price',
`description`= '$description'
WHERE id = $id";
if($con->query($sql) === TRUE){
header('Location: http://localhost/crud/show.php');
}else{
echo "something went wrong";
}
}else{
echo "invalid request";
}
?>
|
Step 8: Delete Data from the MySQL #
Now it’s time to delete the data. Deleting the data is very simple. You just have to tell the id of the data. Based on the ID of the data it will build a SQL query and execute it to delete .
delete.php 1
2
3
4
5
6
7
8
9
10
11
12
13
14
15
16
17
18
19
| <?php
require_once('db.php');
if(isset($_GET['id'])){
$id = $_GET['id'];
$sql = "DELETE FROM `product` WHERE id = $id";
if($con->query($sql) === TRUE){
header('Location: http://localhost/crud/show.php');
}else{
echo "something went wrong";
}
}else{
// redirect to show with error
die('id not provided');
}
?>
|
Remember: Delete query is never invalid. If you write a query for deleting the data and data doesn’t exist, then also it will return TRUE.


 Tweet this article